How To Convert A React Web App To A React Native Mobile App?

Converting your react web app into a wholesome mobile app using react native is easy and straightforward. In this article we describe the various steps needed to do such a conversion along with all the different aspects that needs to be considered throughout the process. We also provide examples and sample code to explain the concepts in detail. Lets dive in.
But before that, let us understand what React and React Native are used for and their main differences and clarify some misconceptions.
What is React?
React is a library for building interactive user interfaces for the web. Its component based architecture allows creation of complex pages and apps from simple base components. The react community already has a huge set of production ready libraries and tools that can be leveraged by developers to create enterprise level apps with ease.
What is React Native?
React Native builds on top of React, to bring React development to native platforms like Android and iOS. React Native supports native modules that allows react code to access platform specific APIs, thus enabling developing truly native apps. Like React, React Native has a community of millions providing libraries and support to developers with common functionality such as routing, state management and caching.
Is React and React Native the same?
No. React is a library for building user interfaces. React Native uses and builds on top of react to bring react development paradigm to Native Platforms such as Android, iOS and windows.
React and React Native Differences
React is:
- Library for building interactive user interfaces for the web
- React by itself is not opinionated about critical web app functionality such as routing, data fetching and caching.
- Frameworks like NextJs and Remix provide support for data fetching, routing, caching etc and is used for building production ready web apps.
Whereas
React Native is:
- Library for building native interfaces using React
- React Native also is not opinionated about native platform functionality such as routing, data fetching and caching.
- Frameworks like expo provide support for routing and native module support (such as in-app purchasing) and make developing and deploying apps easy.
Converting your React App to React Native App
Before starting the process of converting your React app to a React Native app, analyse your web app and consider the following:
- Are you using a framework just as NextJS or Remix? Consider using a framework such as Expo for creating the React Native App.
- Analyse the UI/UX of your web app. Are you using a UI library such as Material UI in your web app? Consider using a UI Library such as React Native Elements or React Native Paper for your mobile app.
- List out all the pages and UI components used in your web app and map them to equivalent mobile app screens and UI components for the mobile app.
- How is styling and theming done on the React app? Choose an equivalent mechanism to handle styling and theming of the UI components in the React Native app.
- Check the navigation and pages hierarchy in your web app and identify the routing and navigation needed on the mobile app.
- Analyse how server side data and API Integration is done in your web app and identify equivalent mechanisms for the React Native app.
- How is the client side state managed in the React app? Map the states and state actions to its react native equivalent.
- Analyse all the packages and dependencies of your React app project. Make sure that all the dependencies can be met in the React Native app. Identify any third party libraries that need to be mapped to its React Native equivalent.
- What tests exist on the React app? Identify test cases that needs to be created or mapped from the web app.
Example
Let us demonstrate the conversion of React app to React native through an example. For this demonstration, we have created a sample NextJS App and converted it to a React Native App. You can download the source code for both projects from Github here:
Sample React Web App Github Project
Sample React Native Mobile App Github Project
The App is intended to monitor the price of stocks in the US stock market. Users can search for stocks and add them to a wish list. The app monitors the stocks in the wishlist and displays changes to its stock price. Detailed information about each stock can be viewed through a detailed view.
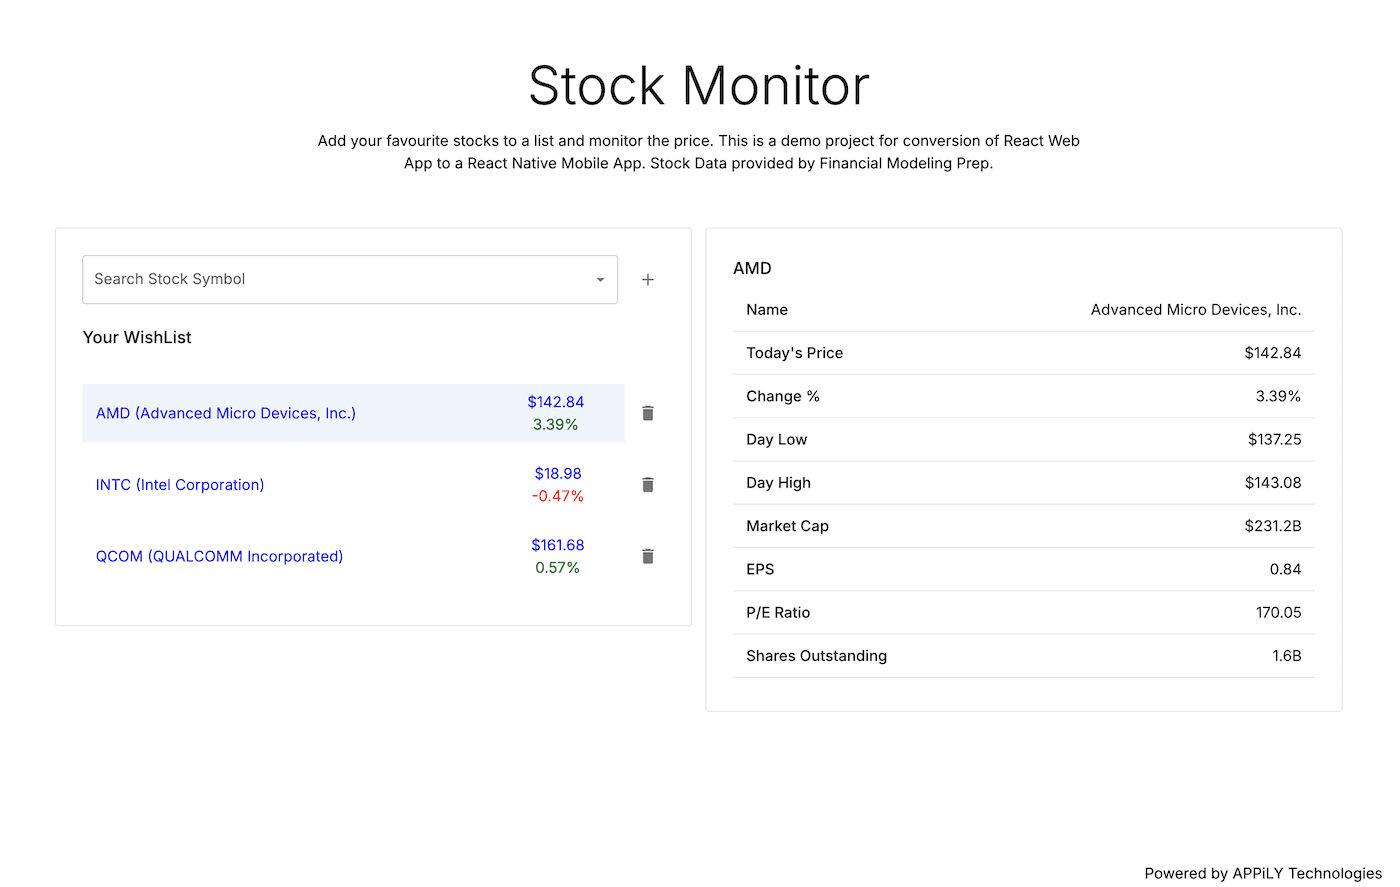
We have purposefully kept the goal and features of the app simple and at the same time, comprehensive enough to cover the various aspects of a real life app such as navigation, API Integration, UI, Theming, Persistent State etc.
As a first step, we analysed the features and dependencies of the react app and mapped to its equivalent in React Native as below.
| React Web App | React Native Mobile App | |
|---|---|---|
| Framework | NextJS | Expo |
| Navigation | Next Router | Expo Router |
| API/Server State Management | Tanstack Query | Tanstack Query |
| Client State Management | Redux | Redux |
| UI Library | Material UI | React Native Elements |
Let us go through each of these aspects of the App in more details:
Setup and App Loading
Before we load the app, we initialise all the necessary components of the app and configure the context providers used in the app. In the nextJS app this part of the code looks like this:
NextJS:
<AppRouterCacheProvider>
   <QueryClientProvider client={queryClient}>
      <ThemeProvider theme={theme}>
         <Provider store={store}>
            <PersistGate loading={null} persistor={persistor}>
               {children}
            </PersistGate>
         </Provider>
      </ThemeProvider>
   </QueryClientProvider>
</AppRouterCacheProvider>
In the NextJS App, we have used Material UI library for UI Components, Styling and Theming. AppRouterCacheProvider from material-ui is included to provide client side caching of server generated UI code.
QueryClientProvider is from tanstack-query which handles server side API data caching, refetching and state management.
ThemeProvider is included from material-ui for theming the applicaiton.
Provider is from redux to handle client side state management and Persist Gate is used for persistent store of the state.
React Native:
<QueryClientProvider client={queryClient}>
   <ThemeProvider theme={theme}>
      <Provider store={store}>
         <PersistGate loading={null} persistor={persistor}>
            <AutocompleteDropdownContextProvider>
               {children}
             </AutocompleteDropdownContextProvider>
         </PersistGate>
      </Provider>
   </ThemeProvider>
</QueryClientProvider>
The react native setup logic looks almost similar to the React App. We use tanstack-query, redux and persistent store in the mobile app similar to the web app.
We have chosen React Native Elements as the UI library for the React Native App. Hence the ThemeProvider in this case is from React Native Elements. AutocompleteDropdownContextProvider was required, since we used a third party library react-native-autocomplete-dropdown to provide the stock symbol search UI.
Navigation
NextJS uses a file system based routing mechanism for layouts and navigation. The root layout is coded in the file app/layout.tsx. This layout file displays the search bar and the list of stocks in the wish list. The stock details page is located under app/[stock]/page.tsx and it displays detailed information of the stock.
In order to navigate from the stock list to the stock details, the next/link component is used to wrap the stock summary row. The code for this looks like below:
React:
<Link href={"/" + stock.symbol} style={{textDecoration: 'none'}}>
   <ListItem
      ...
   </ListItem>
</Link>
The expo react native app uses expo-router for routing and navigation. Expo Router also uses a file based routing mechanism similar to Next Router. Hence the code structure remains similar for both apps.
The root layout is coded in the file app/_layout.tsx and the stock details page is coded under app/[stock].tsx .
In order to navigate from the stack list to the stack details, the Link component from expo-router is used to wrap the stock summary row, similar to the react web app.
React Native:
<Link
   href={{
      pathname: "/[stock]",
      params: { stock: stock.symbol },
   }}
   asChild>
      <ListItem.Content style={styles.container}>
         ...
      </ListItem.Content>
</Link>
Networking and API Integration
The app uses APIs from the website Financial Modelling Prep to fetch stock data. The library Tanstack Query is used for fetching, refetching and caching the API response data. This library in turn uses the fetch API to make the HTTP request to the server.
We use the same library for fetching and caching data in the react native app as well. Hence the code for networking remains the same in both apps.
const useStockQuotes = (symbols: string[]) => {
  return useQuery({
    queryKey: ["quote", [...symbols]],
    queryFn: () => fetchQuote(symbols.join()),
    select: (data) => data?.data
  });
};

const fetchQuote = async (symbol: string): Promise<Array<StockProps>> => {
  const API_KEY = process.env.NEXT_PUBLIC_FMP_STOCK_API_KEY;
  const response = await fetch(
    `${BASE_URL}/api/v3/quote/${symbol}?apikey=${API_KEY}`
  );
  if (!response.ok) {
    throw new Error(
      response?.status === 429
        ? "API Request Limit Reached"
        : response.statusText || "Error Fetching Stock Data"
    );
  }
  const data = await response.json();
  return data;
};
Client State Management
We have used redux for state management and persistently store the wish list of stock symbols in both the react and react native code. Thus the code for setting up the store and store action are similar for both apps.
export const stocksSlice = createSlice({
  name: "stocks",
  initialState: initialState,
  reducers: {
    add: (state, action: PayloadAction<StockProps>) => {
      const stock = action.payload;
      const index = state.findIndex((s) => s.symbol === stock.symbol);
      if (index < 0) {
        state.push(action.payload);
      }
    },
    remove: (state, action: PayloadAction<string>) => {
      return state.filter((stock) => stock.symbol !== action.payload);
    },
  },
});
User Interface
We have used material-ui library in the react web app. For example to display the list of stocks in the wishlist, we have used the Material UI List and ListItem components.
React:
const StockItem = ({ stock }: { stock: StockProps }) => {
    return (
      <Link href={"/" + stock.symbol}>
        <ListItem
          key={stock.symbol}
          disableGutters
          secondaryAction={
            <IconButton onClick={() => removeHandler(stock)}>
            <DeleteIcon />
           </IconButton>
          }
        >
          <ListItemButton selected={pathname === "/" + stock.symbol}>
            <ListItemText primary={`${stock.symbol} (${stock.name})`} />
            {stock.price && (
              <Stack>
                <Typography>{stock?.price}</Typography>
                <Typography
                  color={stock?.changesPercentage < 0 ? "red" : "green"}
                >
                  {stock?.changesPercentage}
                </Typography>
              </Stack>
            )}
          </ListItemButton>
        </ListItem>
      </Link>
    );
  };
In the React Native app, we have used the React Native Elements UI Library. Thus we have used the ListItem component from the React Native Elements library, but the code structure is similar to the React app.
React Native:
const renderItem = ({ item: stock }: { item: StockProps }) => {
    return (
      <ListItem bottomDivider>
        <Link
          href={{
            pathname: "/details/[symbol]",
            params: { symbol: stock.symbol },
         }}
          asChild
          style={{ flex: 1 }}
        >
          <Pressable>
            <ListItem.Content style={styles.container}>
              <ListItem.Title style={styles.title}>
                  {`${stock.symbol} (${stock.name})`}
              </ListItem.Title>
              {stock.price && (
                <View style={styles.price}>
                  <Text>${stock?.price}</Text>
                  <Text
                    style={{
                      color: stock?.changesPercentage < 0 ? "red" : "green",
                    }}
                  >
                    {stock?.changesPercentage.toFixed(2)}%
                  </Text>
                </View>
              )}
            </ListItem.Content>
          </Pressable>
        </Link>
        <Icon
          name="delete"
          type="material-community"
          onPress={() => removeSymbolHandler(stock)}
        />
      </ListItem>
    );
  };

  return (
    <FlatList
      keyExtractor={(item) => item.symbol}
      data={stocks}
      renderItem={renderItem}
    />
  );
Conclusion
React is a library for building interactive user interfaces. React Native is a library built on top of react to enable react development on native platforms such as Android and iOS.
In this blog, we have discussed the factors to consider while converting a React app to a React Native App. We have also shown the steps involved in the conversion using a sample application.
If you would like to convert your existing React app to a React Native app or develop a web or mobile application from scratch, contact us at app@appilytech.com
Contact Us
You Might Be Interested

Technology
React Native App Vs Native App: Five Factors To Consider
React Native or Native apps? Read our in-depth comparison, covering performance, User Interface, development time & cost and ease of maintenance and support.

Technology
React Native Starter Template
The React Native Starter Template is a pre-configured Expo app designed to accelerate your mobile app development process. It comes equipped with essential packages and boilerplate code to jumpstart your React Native project.

Technology
Top Four Benefits Of A React Native Mobile App
Explore the key benefits of React Native for mobile apps: Native Performance, Cross Platform methodology, robust ecosystem and seamless full stack integration.